The best online tool to
create your own comic strips and cartoons is Toondoo. You just have to click a
few times and drag and drop a few items and your comic strip will be ready to
share with your loved ones or social network friends. This web 2.0 tool allows
you to create, design and share comic strips and it provides you several
cartoon characters or the possibility to create new ones.
I think it is a very
useful tool because students can express themselves through their comic strips,
practice their writing and reading skills and create advertising campaigns
about many topics to raise awareness such as contamination, the importance of
eating healthy food, harassment, the importance of rules of cohabitation, among
others. Moreover, the students can become more creative and autonomous builders of their own stories.
There
are some steps you should follow to make use of this tool:
Step 1
Go to http://www.toondoo.com/. To start
creating your own comic strips, you need to sign up first, but don’t worry it
is for free. Click on the red button “Sign up for free” on the right top of the
site.
Step 2
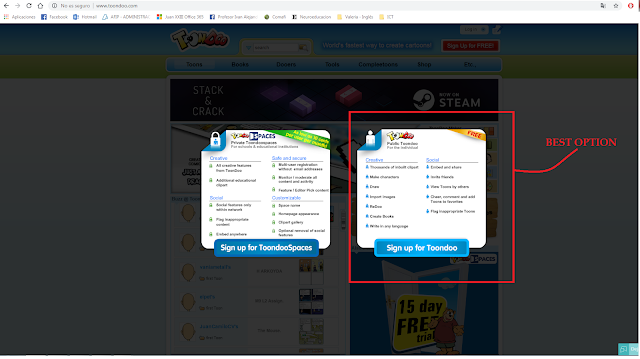
When
you click on sign up for free, a window will pop up with two options: public
toondoo for the individual or private toondospaces. The first one is for free
and the second one, the users have to pay por it, but it is for schools and
educational institutions. Choose the first option.

Step 3
The site will ask you to provide your
username, password and email. Once you have logged in to the site, go to the
menu, where it says toons, books, dooers, tools and place the mouse on the
option Toons. A drop down menu will pop up, select the option create toon.
The
site will lead you to select a horizontal or vertical layout. Choose one of the
options.
Afterwards, the site will lead you to the layout you have chosen and you
can start creating your comic strip by dragging and dropping several items from
the menu at the top of the site: characters, scenes, objects, speech bubbles
and images saved in your computer. You can write a title for your strip just by
clicking on “untitled” (above your comic strip). And below it, you’ll find many
tools that help you accommodate or edit your comic strip such as the following:
- · Lock: to immobilize the object
- · Shrink and enlarge: to change the size of the object
- · Clone: to make a copy of the object
- · Flip: to turn over the object
- · Rotate: to spin the object to the left or to the right
- · Front: to send the object to the front
- · Back: to send the object to the back
- · Delete: to remove the object
Besides you can find in the right part of the menu, below the comic
strip more tools if you want a more personal design:
Ø DoodleR: to draw a character or an object that is not available in the options
Ø TraitR: to create your own character (you can choose its physical
characteristics)
Ø ImagineR: to upload images from your computer to add to your comic strip
Step 6
Once
you have written the title and added the characters, speech bubbles and scenes,
your comic strip will be ready to be saved. Place the mouse on “Toondoo Start
here” button. It is on the left top of the site, next to all the items you can
drag and drop. A small drop down menu will appear. Click on save as and then. You’ll
be asked to fill in some fields: title, description and tags. You should also
select a language and choose if you want to publish your comic strip for anyone
to see it, share it with your friends or keep it private. Finally, you click on
publish.
References:
Ministerio de Educación. Tutorial Toondoo. Retrieved from: http://integrar.bue.edu.ar/integrar/blog/articulo/tutorial-de-toondoo/


No hay comentarios:
Publicar un comentario